Hey everyone, welcome back to the grind! If you’re someone who works with metal fabrication, woodworking, or even automotive repair, you know how crucial the right tools are for a smooth, efficient finish. Today, I’m breaking down exactly how to install a ceramic flap disc — and yeah, I’m coming at this from the supplier side, so I’ve got real-world tips I’ve picked up from years of dealing with these bad boys, not just some textbook jargon. Ceramic Flap Disc

First off, let’s cut to the chase: a ceramic flap disc isn’t like those old, flimsy fabric discs you might’ve used in the past. These things are built to last, grind faster, and stand up to way more heat — which is why so many pros swear by ’em now. But if you don’t install ’em right? You’re wasting your time, risking injury, and even shortening the disc’s life before you even use it. I’ve seen guys skip a step or two and end up with a wobbly disc that bounces all over the place, chewing into their workpiece instead of smoothing it. Not cool.
So let’s start with the prep work before you even touch the disc. What do you need? First, your angle grinder — obviously, but make sure it’s compatible. Most angle grinders for flap discs run between 4.5 inches and 7 inches, but double-check your grinder’s maximum RPM rating. Ceramic flap discs spin fast, so if your grinder’s max RPM is too low, you’ll not only get poor performance but also the disc could come loose or even break. That’s a safety hazard, y’all — never skip checking RPM.
Next, grab the right tools for the job: a wrench (usually two wrenches, one to hold the grinder’s spindle and one to tighten the nut), a clean rag, and maybe a marker to note the disc’s direction — more on that in a sec. Also, a quick visual check of your grinder: make sure the spindle threads aren’t rusty or clogged with old gunk. If they are, wipe ’em down with that rag; a little grime can throw off the fit and make the disc wonky.
Oh, and pro tip from our shop: don’t just grab any ceramic flap disc off the shelf. Match the grit to your project. For heavy grinding (like removing welds or thick rust), go for a 36 or 60 grit. For smoothing and finishing, 80 to 120 grit is your jam. Using the wrong grit for the job is like using a sledgehammer to hang a picture — overkill, messy, and slower.
Now, let’s get into the actual installation step-by-step, and I’m gonna make this as straightforward as possible, no confusing terms. First, power off and unplug your grinder. This is non-negotiable. I don’t care if you think the grinder is off — take two seconds to unplug it, or remove the battery if it’s cordless. You don’t want it to accidentally turn on while you’re messing with the disc. Trust me, I’ve seen a coworker knock a grinder on, and it’s not fun.
Once your grinder’s safe, remove the old disc (if you’re replacing one). Here’s how: find the spindle lock button on your grinder — it’s usually a small button on the side or front that, when pressed, keeps the spindle from spinning. Press that in, then use one wrench to hold the spindle steady, and the other to loosen the center nut. Most flap disc nuts are reverse-threaded? Wait, no — wait, hold on, no, angle grinder nuts are right-hand threaded, but when loosening, you turn them counterclockwise. Wait, let me make sure I get that right. Yeah: to remove the nut, with the spindle lock pressed, turn the wrench counterclockwise. Don’t force it too hard — if it’s stuck, a little penetrating oil on the threads will help, just let it sit for a minute before trying again.
With the old disc off, clean the mounting flange — that’s the metal part on the grinder where the disc sits. If there’s old adhesive, rust, or metal shavings on there, wipe it down with that rag. A dirty flange means the disc won’t sit flat, which leads to wobbling. We’ve had customers bring back discs saying they broke, and half the time it’s because they skipped cleaning the flange. Don’t be that guy.
Now, take your new ceramic flap disc. Look at the center — there’s a hole, obviously, but also, most discs have an arrow on the back. That arrow is the rotation direction. You have to make sure the arrow matches the direction your grinder spins. If you mount it backwards, the flaps will catch instead of glide, which causes overheating, splattering, and way more wear on the disc. How do you check your grinder’s spin direction? Turn the grinder on briefly (for a second, don’t let it run long) and look at the motor housing — there’s usually an arrow there pointing the direction it spins. Or, if you’re not sure, our team always tells customers: if the grinder is held normally (handle at the bottom), it spins clockwise when you pull the trigger. So make the disc’s arrow point clockwise, same as the grinder. Got it? That’s a super common mistake, so pay attention here.
Next, place the disc onto the spindle. Make sure it sits fully flat on the mounting flange — no tilting, no gaps. If the disc has a back pad (some thicker ceramic discs do), that should sit against the flange, right? Wait, yeah: the flap side (the abrasive side) should be facing away from the grinder, towards your workpiece. The smooth, fabric back of the disc goes against the flange. That’s another thing people mix up — don’t put the flaps against the grinder, that’d be terrible.
Now, the center nut. Thread it on by hand first — no tools here, because you don’t want to cross-thread the spindle. Cross-threading means the nut isn’t straight on, and it’ll strip the threads, which ruins your grinder. So hand-tighten until it’s snug, then grab your two wrenches. Press the spindle lock button again to hold the spindle, then tighten the nut clockwise. How tight? You want it snug, but not so tight that you can’t loosen it later. A good rule of thumb: if you can’t twist the nut with your fingers after it’s hand-tight, that’s enough. Over-tightening can warp the disc, which leads to wobbling during use. I’ve had a guy crank a nut so hard the ceramic flap disc bent before he even turned the grinder on — waste of a good disc, y’know.
Wait, let’s add a quick check here: once the nut is tight, give the disc a little nudge with your finger. It shouldn’t move around at all — if it wiggles, you didn’t clean the flange enough, or the nut’s not tight enough. Fix that before you use it, because a wobbly disc is dangerous.
Now, after installation, do a safety check before you fire it up. Put on your PPE — safety glasses, ear protection, maybe a dust mask. Ceramic disc dust is fine, so it’s not great to breathe in. Also, make sure your work area is clear, no loose clothes or hair that could get caught. Plug the grinder back in (or put the battery in), hold the grinder firmly with both hands (one on the main handle, one on the side handle), and turn it on. Let it run for 10-15 seconds idle. Watch it — if it wobbles, turns weird, or makes a noise it shouldn’t, turn it off immediately and check your installation. Most of the time, it’s a loose nut or a misaligned disc.
Now, here’s a few extra tips from our shop that aren’t in the basic installation guide. First, if you’re using a 7-inch ceramic flap disc on a heavy-duty grinder, make sure the flange is the right size — 7-inch discs need a 7-inch flange, otherwise it’ll sit off-center. Second, after every use, remove the disc if you’re storing the grinder for a while. Leaving a disc on the spindle can cause the nut to rust, and the disc might stick to the flange. Third, don’t use a ceramic flap disc for cutting — these are for grinding and finishing, not slicing metal. That’s what cut-off wheels are for. Using the wrong disc for the wrong job not only wears it out fast but is unsafe.
Wait, let’s talk about common mistakes we see all the time. One: people force a disc that’s the wrong size for their grinder. A 4.5-inch disc doesn’t fit a 7-inch grinder — that’s a no-brainer, but I’ve seen it. Two: not checking RPM. If your grinder’s max RPM is lower than the disc’s recommended RPM, the disc can disintegrate mid-use. Our ceramic flap discs come with clear RPM specs on the packaging, so always check that. Three: not replacing the disc when it’s worn. If the flaps are flat, or the disc is warped, don’t keep using it — it’s just not effective and can be dangerous.
So, all that said, installing a ceramic flap disc isn’t rocket science, but it’s important to do it right. Skip the steps, and you’ll end up with a bad finish, wasted time, or even an accident. Our team’s been in the game for years, so we know how to make sure these discs work as good as they’re supposed to — but only if you install ’em correctly.
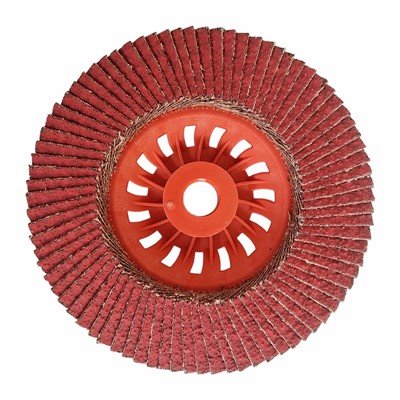
If you’re looking to stock up on high-quality ceramic flap discs, or you’ve got questions about which grit or size is right for your project, hit us up to chat. We’re not just a supplier — we’re here to help you get the job done right, whether you’re a hobbyist in your garage or a pro on a big job site. No fancy links, no hoops to jump through — just reach out, and we’ll walk you through whatever you need.
Abrasive Polishing Wheel References:
- "Angle Grinder Safety and Proper Disc Installation" – Occupational Safety and Health Administration (OSHA)
- "Abrasive Wheel and Disc Best Practices" – Grinding Technology Association
- "Ceramic Flap Disc Performance Guidelines" – Industrial Abrasives Manufacturer’s Association
- "Tool Compatibility for Abrasive Discs" – Power Tool Institute
Henan Yandisc Hardware Tools Co., Ltd.
As one of the most professional ceramic flap disc manufacturers and suppliers in China, our products have good reputation in the market. Please feel free to wholesale high quality ceramic flap disc made in China here from our factory. Customized orders are welcome.
Address: Zinan Road, High-tech Industrial Development Zone, Zhengzhou, Henan, China
E-mail: info@yandisc.com
WebSite: https://www.yandisc.com/
